
Soldering Skills For The Beginner

Basic Soldering
Techniques
for Vintage Radio
Welcome to the Bench
If you've recently acquired a vintage or antique radio — perhaps a cathedral-style Philco from the 1930s, a handsome Zenith console, or a charming little All-American Five from the postwar era — and you're thinking about bringing it back to life, welcome. You've found your way to one of the most rewarding hobbies there is.
Before you can recap those old capacitors or replace a faulty resistor, you need one fundamental skill: soldering. It's the glue that holds every electronic circuit together, and doing it well is the single most important skill a beginning radio restorer can develop.
This article is a patient, step-by-step introduction. We're going to talk about what kind of iron to use, how hot to run it, why flux is absolutely non-negotiable, the difference between a proper mechanical joint and a cold solder blob that'll fail in six months, and a handful of hard-won tips that will save you grief. Let's get started.
Your Soldering Setup
You don't need a professional rework station to do quality vintage radio work. A good temperature-controlled soldering iron in the 40–60 watt range is your starting point. Avoid unregulated "fire-starter" irons from the hardware store — the cheap ones with no temperature control will either be too cold to make a good joint or too hot, lifting delicate traces and damaging components.
Look for a station with a chisel tip, not a conical point. A chisel tip gives you a flat surface that transfers heat much more efficiently to the joint. You'll use less time on each connection, which means less heat damage to surrounding components — critical when working on irreplaceable vintage parts.
- Temperature-controlled soldering iron (40–60W)
- Chisel-style tip (2–3mm width)
- Brass wire tip cleaner (not a wet sponge)
- 60/40 or 63/37 rosin-core solder
- Flux pen or paste flux (rosin-based)
- Solder wick and/or a solder sucker for desoldering
- Helping hands / third-hand tool
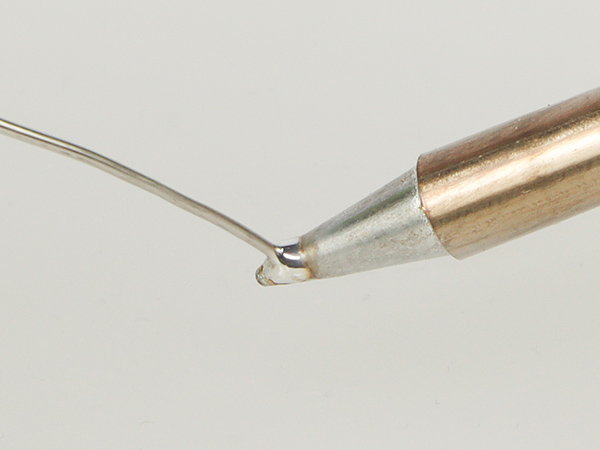
Fig. 01 — A clean, tinned tip is your starting point for every session.
The Thermal Scale
Temperature control is everything. Too cold and your joints will be unreliable; too hot and you'll destroy the very components you're trying to save. Most vintage radio work lives in the 650°F – 750°F range.
| Range | Zone | When to Use |
|---|---|---|
| 550–599°F | Too Low | Solder won't flow; cold, grainy joints. |
| 600–649°F | Low Range | Marginal — only for very small, delicate signal connections. |
| 650–699°F | Sweet Spot | Default. Ideal for most point-to-point wiring in vintage radios. |
| 700–749°F | Heavy Work | Chassis ground lugs and large terminals with high thermal mass. |
| 750–799°F | Caution | Risk of component damage. Keep contact under 3 seconds. |
| 800–850°F | Danger Zone | Risk of lifted traces, melted insulation. Avoid. |
Why not just crank it up? A hotter iron doesn't mean a faster joint — it means faster damage. Vintage components are all more fragile than their modern counterparts. Start at 675°F, make your joint quickly (2–3 seconds of iron contact), and only increase temperature if you're struggling with heavy thermal mass.
"Soldering without flux is like doing a greasy batch of dishes without soap."

Fig. 02 — Notice the thin wisp of smoke: that's the rosin flux doing its job.
The Flux Manifesto
Flux is a chemical cleaning agent that removes oxides from the metal surfaces you're trying to join. Without it, molten solder simply beads up and rolls off like water on a waxed car. With it, solder flows eagerly into the joint, wetting the surfaces and creating a strong metallurgical bond.
When you're working on vintage radios, the metals you encounter — copper wire, brass terminal lugs, tinned steel chassis — have all had decades to oxidize. Flux dissolves that layer at soldering temperature, giving you a clean surface at the exact moment solder is flowing.
The golden rule: if solder won't stick, the answer is almost never "more heat." The answer is more flux. A flux pen or a small dab of rosin paste applied to the joint before you touch your iron will transform a frustrating cold joint into a perfect one.
Always use rosin-based flux for electronics work. Never use acid flux or plumber's flux — these will corrode your circuit connections over time, destroying the very radio you're trying to save.
Rosin Core Solder Basics
If you slice a piece of solder wire down the middle, you'll see one or more hollow channels filled with rosin flux. As the solder melts, the rosin liquefies first, flowing out ahead of the molten metal to clean the joint surface. For vintage radio work, you want one of two alloy ratios:
The classic, time-tested ratio. Has a small "pasty" range between liquid and solid. The solder of choice for generations of radio technicians.
The "eutectic" alloy — transitions from liquid to solid at a single temperature (361°F) with no pasty phase. Shinier joints and more resistant to cold solder problems.
For wire gauge, look for 0.031" (0.8mm) diameter. Avoid thick plumbing solder — it applies way too much material for electronics work.
Lead-free solder requires higher temperatures, flows poorly, and produces joints that are harder to inspect visually. For vintage radio restoration, traditional leaded solder is strongly preferred. Work in a ventilated area and wash your hands when done.
 Fig. 03 — Rosin-core solder and paste flux: your two essential consumables.
The J-Hook vs. the Straight Lead
This is where many beginners make their first structural mistake, and it's one that has consequences months or years later when the radio starts acting up intermittently.
Before any solder touches the joint, the wire lead is physically bent into a hook shape and wrapped around the terminal. This creates a mechanical connection that would hold even without solder. The solder then fills the wrapped joint, sealing out air and creating both an electrical and structural bond.
The wire lead is simply butted up against the terminal and solder is applied directly. There is no mechanical wrap — solder alone holds the wire. This is a ticking time bomb. Vintage radios experience significant thermal cycling as tubes heat up and cool down, stressing every joint until it cracks.
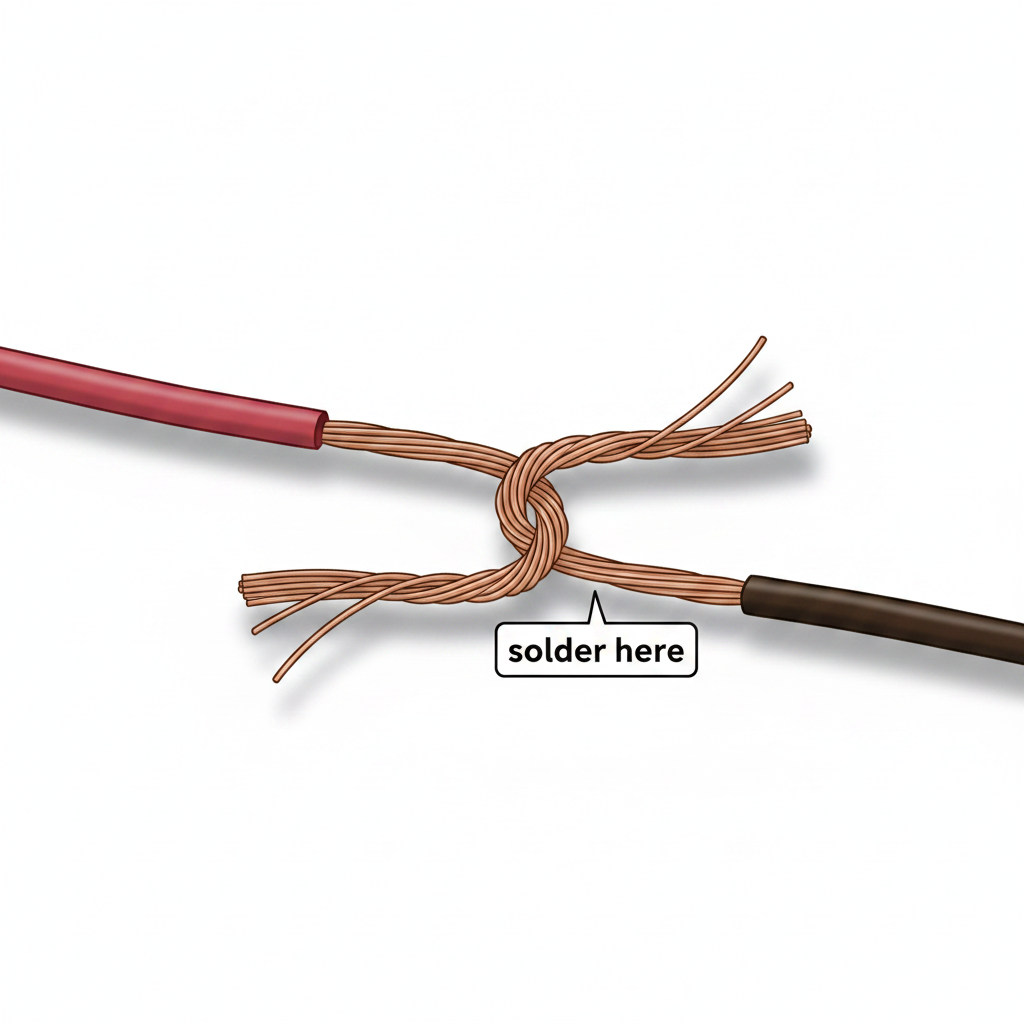
Fig. 04 — A proper J-hook connection: mechanical first, solder second.
How to Make a Proper J-Hook
- 01Strip the wire. Remove about 3/8" of insulation from the lead. Scrape any heavy oxidation from the bare wire until you see copper color.
- 02Form the hook. Using needle-nose pliers, bend the stripped end into a small J or hook shape just wide enough to slip over or through the terminal lug or other wire.
- 03Wrap the terminal or join the wires. Hook the wire through or around the terminal and crimp it down gently so it grips. If it’s two wires being joined, hook the two j’ s together and crimp them. The connection should hold mechanically — no solder needed yet.
- 04Apply flux. Touch your flux pen to the joint. Extra flux on an aged joint is always good insurance.
- 05Heat and solder. Press your iron flat against both the wire and the terminal. After 1–2 seconds, touch solder to the opposite side of the joint. Solder should wick in by capillary action forming a smooth, shiny, concave fillet. Remove solder, then iron. Total contact time: 2–3 seconds.
Essential Tips & Wisdom
Tin Your Tip Before Every Joint
Before each solder connection, melt a small amount of solder onto your iron tip to create a thin, shiny coating. This 'tinning' improves heat transfer dramatically and protects the tip from oxidation. A clean, tinned tip is the difference between a 2-second joint and a 10-second struggle.
Heat the Joint, Not the Solder
The most common beginner mistake: touching solder directly to the iron to melt it onto the joint. Instead, heat the joint with your iron and let the joint melt the solder. When solder is pulled into a hot joint by capillary action, you get a proper metallurgical bond.
Use a Brass Wire Cleaner, Not a Wet Sponge
The old wet-sponge technique thermally shocks your iron tip every time you wipe it. A brass wire ball cleaner removes oxidation without the temperature drop. Your tips will last years instead of months.
Learn to Recognize a Good Joint
A proper solder joint is shiny, smooth, and slightly concave. A bad joint looks dull, lumpy, or blobby. If it looks like a tiny ball sitting on top of the connection rather than flowing into it, reheat and add flux.
Protect the Neighbors
Vintage components are often packed tightly on terminal strips. Use a heat sink clip — a small alligator clip attached between the component and the joint — to protect heat-sensitive parts from stray iron contact.
Practice on Scrap First
Before you touch your vintage radio, spend 30 minutes practicing on scrap wire and an old terminal strip. Practice J-hooks, practice feeding solder, practice the rhythm of heat-apply-remove. That 30 minutes will save you hours of frustration.
Don't Blow on Joints to Cool Them
Rapid cooling from blowing disrupts the crystalline structure of the solder as it solidifies, potentially creating invisible fractures. Let joints cool naturally. It only takes a few seconds.
Ventilation Is Not Optional
Rosin flux smoke is an irritant and sensitizer. Work in a well-ventilated area or use a small bench fan to push fumes away from your face. A fume extractor with an activated carbon filter makes long restoration sessions much more comfortable.